SmartPO Support
Multi-factor Authentication (MFA) Support
Looking for help with multi-factor authentication?
Click here for the step-by-step process, FAQs, and more.
SmartPO Login
Log inGet SmartPO Knowledge Base Articles
Latest Release Notes
Available Training
Boost your career with EP Academy courses.
FAQs
SmartPO
Tips for troubleshooting PO submission problems:
- Verify the vendor name. Some studios restrict POs to vendors that are already created in the accconting system. Make sure the vendor name in the accounting system matches the vendor being entered in SmartPO so they can link together successfully. You may need to enter or create a new vendor if your PO is is still using TEMP VENDOR.
- The PO may be delayed during the approval process. The Purchase Order module displays the approval flow and where the PO is being delayed. Check with the approver at that level, or reference the approval flow documentation for help.
- Check or refresh your internet connection. Close the show, clear your browser cache, and try again. You may also attempt from an ‘incognito’ browser tab.
Vendors are pulled into SmartPO from the accounting system. SmartPO allows temporary vendors as place holders until permanent vendors are in the accounting system.
If the temporary vendor is not clearing, it is likely that there is not an exact matching vendor name in the accounting system. Update the PO vendor name to match the vendor name in the accounting system, or update the vendor name in the accounting system to match the vendor name on the PO.
There may have been coding changes in the accounting system. If a field is missing or incorrect, go back to the accounting system to make the coding corrections.
If an account is not available or missing, ensure the appropriate department is linked in the settings and that the account is active in the accounting system.
- Select the approval flows you wish to reassign.
- Add an approver to those level or levels.
- Pull all the POs, invoices or payments currently assigned to that approval flow.
- Resubmit all the POs, invoices or payments to the new approver.
Note: Ensure that your approval flow is assigned to the right department.
Only the designated Studio Admin can add users to SmartPO. EP support reps cannot add users. If the Studio Admin does not have access, contact your Account Manager for assistance.
For more information on EP Account and login, visit the Login Support page.
To add users to SmartPO:
- Navigate to the Users tab under Management.
- Click the Add New button on the upper right.
- Type in the new user’s EP Account email address and tab to the next field. The user's name and initials will automatically populate. If the user does not have yet an EP Account, enter their email address and name. Tabbing will automatically populate the intials field.
- Select the user's department(s). The department list needs be populated before selecting departments in this screen.
- Select the role for the user.
PO Creator can create POs and does not have access to the Management screens
Approver cannot create POs but has read access to Departments and Approval Flows
Show Admin can create POs and has full access to Management screens
Note: The role of the user does not give them the ability to approve POs; they are able to approve POs when they are added to an approval flow. - Designate the level of PO visibility for the user.
Purchase orders created by this user only allows users to view their own POs
Purchase orders created in this user’s department(s) allows users to view POs created in the departments they have access to
All purchase orders give users access to all POs in the show
7. Click the Save button in on the upper right.
Approvers are assigned by the department. An Approver can Approve, Revise, or Deny a purchase order.
Approval process
- As an Approver, you will receive a notification email that incldues a summary of the submitted Purchase Order.
- Once in SmartPO, navigate to the Approvals dashboard to view the list of POs waiting for your approval. Select the PO you would like to review.
- From this view, you can then choose to either Approve, Revise, or Deny the PO.
Approve |
| Approves the PO as is. |
Revise |
| Select if the PO needs revision. This option requires a note to be entered as to why the PO was not approved. |
Deny |
| Select if the PO is denied. This option requires a note to be entered as to why the PO was denied. |
The default setting are located under Management and the Setting menu. From there, you can customize your set up.
Customizable Settings
- Assign PO prefixes and starting numbers
- Create categories
- Assign billing and shipping addresses
- Assign default terms and conditions
- Select a date format. This is your preference and will not necessarily carry over to other applications or users.
- Select autosend PO to vendors
- Select entry and SmartHub options
- Select email notication preferences. You may select to receive a daily batch notication at midnight or other customized options. To do this, click your name drop down in the upper right corner.
For in-progress and approved POs:
- Click the PO to view the details
- Select the Export PDF button in the upper right and
- Select Download PDF
- Open the PDF and select the print option in the viewer
For POs in draft select the Save and Review button which will give you access to the Export PDF button.
Resending a PO only applies to Approved POs. Click on the PO you want to resend to accounting. Find the “Resend to Accounting” button and click it.
When a studio admin adds you to a show in SmartPO, you will receive a welcome letter email. The email will invite you to register using your EP Account username. Your EP Account username is the email address the admin used to create your profile, and should be where you received the welcome letter.
If you do not receive a welcome letter, contact your studio admin and verify that the email address you are registered with is correct.
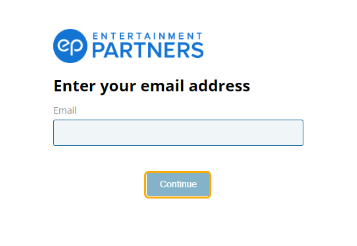
- Navigate to SmartPO.ep.com, input your email, and select Continue.
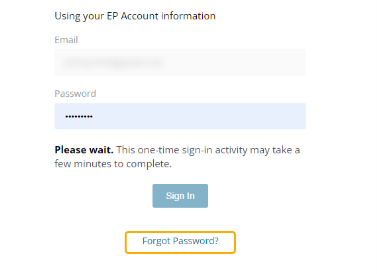
- Click Forgot Password? on the following screen below the Sign In button.
- Click Send Request. A password reset link will be sent to the email associated with your EP Account.
- Click on the link sent to your email and follow the prompts to create a new password.
Note: This link expires after one hour. Repeat the above steps if you cannot reset your password within this time limit.
SmartPO is supported on the latest versions of Chrome, Firefox, and Safari.
- The Export Log has a file size cap.
- SmartPO has a 45 Character Description limit.
- Change orders often create a large export log when attachments are used. Previous attachments may need to be deleted from SmartPO before you can create a change order with new attachments.
Failed to send to accounting
SmartPO will send POs to Vista5 and SmartAccounting. If a single PO is failing to send, check for bad data entries. If many POs are failing to send, reach out to our support team for further assistance.
Error message with numbers
If a single PO is failing to send, check for bad data entries. If many POs are failing to send, reach out to our support team for further assistance.
Once a PO is fully approved and submitted, it cannot be deleted or voided. The PO information is managed in the accounting system and is retained in SmartPO as a record.
To delete a PO that has not yet been approved, pull it from approval flow and delete it in a draft state.
The SmartPO manual can be found next to your user profile drop-down menu at the top right of the screen. The drop-down menu can be accessed by clicking the question mark (?).
Back to top
CONTACT US
United States
Mon 12:00am to Fri 8:00pm PT (24x5)
Sat/Sun 7am to 7pm
818.955.6300
After Hours: 818.955.6300
Canada
Mon-Fri 5:30am to 5:30pm PT
+1.800.830.8882
clientsupport@ep.com
After Hours
Mon 12am to Fri 8pm PT (24x5)
Sat/Sun 7am to 7pm
+1.800.830.8882
support@ep.com
Australia
Available 24 hours a day, 7 days a week.
+61.1800.418.507
support@ep.com
New Zealand
Available 24 hours a day, 7 days a week.
+64.800.450177
support@ep.com

